Creating GUIs
You can create an object that represents a GUI drawn on the user’s screen (not in the terminal window). It can have buttons, labels, and the usual GUI elements. In combination with a boot file, entirely GUI-driven vessel controls can be developed.
GUI Callbacks versus Polling
There are two general styles of interacting with GUI widgets, called “callbacks” and “polling”.
The callback technique is when you create KOSDelegate objects
that are either anonymous functions or named user functions, and then
assign them to different widgets’ “hook suffixes”. In this technique you
are telling the widget “Here is a function in my program that I want you to
call whenever you notice this particular thing has happened.” For example:
set thisButton:ONCLICK to myclickFunction@.
// Program continues on, executing further commands after this.
will interrupt whatever else you are doing and call a function you wrote
called myClickFunction whenever that button is clicked.
The polling technique is when you actively keep checking the widget again and again in your own script, to see if anything has happened. In this technique, you are choosing when to pay attention to the GUI widget. For example:
until thisButton:TAKEPRESS {
  // button still isn't pressed yet, let's keep waiting.
  wait 0.
}
In general, if you are trying to decide between using the callback or the polling technique, you should prefer using the callback technique most of the time. It takes less CPU time away from the rest of your program and is less of a burden on the universe simulation.
Below are longer examples of the two techniques, and how the scripts that use them would look. The suffixes and built-in functions used in these examples will be explained in detail later.
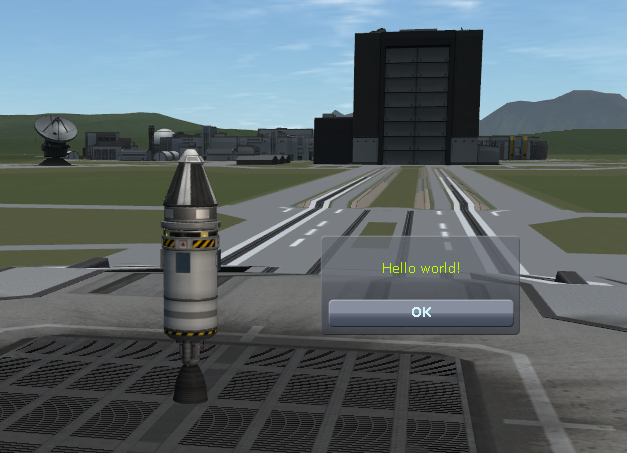
The “Hello World” program, version 1 with “callbacks”:
// "Hello World" program for kOS GUI.
//
// Create a GUI window
LOCAL gui IS GUI(200).
// Add widgets to the GUI
LOCAL label IS gui:ADDLABEL("Hello world!").
SET label:STYLE:ALIGN TO "CENTER".
SET label:STYLE:HSTRETCH TO True. // Fill horizontally
LOCAL ok TO gui:ADDBUTTON("OK").
// Show the GUI.
gui:SHOW().
// Handle GUI widget interactions.
//
// This is the technique known as "callbacks" - instead
// of actively looking again and again to see if a button was
// pressed, the script just tells kOS that it should call a
// delegate function when it notices the button has done
// something, and then the program passively waits for that
// to happen:
LOCAL isDone IS FALSE.
function myClickChecker {
  SET isDone TO TRUE.
}
SET ok:ONCLICK TO myClickChecker@. // This could also be an anonymous function instead.
wait until isDone.

print "OK pressed.  Now closing demo.".
// Hide when done (will also hide if power lost).
gui:HIDE().
The same “Hello World” program, version 2 with “polling”:
// "Hello World" program for kOS GUI.
//
// Create a GUI window
LOCAL gui IS GUI(200).
// Add widgets to the GUI
LOCAL label IS gui:ADDLABEL("Hello world!").
SET label:STYLE:ALIGN TO "CENTER".
SET label:STYLE:HSTRETCH TO True. // Fill horizontally
LOCAL ok TO gui:ADDBUTTON("OK").
// Show the GUI.
gui:SHOW().
// Handle GUI widget interactions.
//
// This is the technique known as "polling" - In a loop you
// continually check to see if something has happened:
LOCAL isDone IS FALSE.
UNTIL isDone
{
  if (ok:TAKEPRESS)
    SET isDone TO TRUE.
  WAIT 0.1. // No need to waste CPU time checking too often.
}
print "OK pressed.  Now closing demo.".
// Hide when done (will also hide if power lost).
gui:HIDE().
Creating a Window
-
GUI(width [, height])
This is the first place any GUI control panel starts.
The GUI built-in function creates a new GUI object that you can then
manipulate to build up a GUI. If no height is specified, it will resize
automatically to fit the contents you put inside it. The width can be set
to 0 to force automatic width resizing too:
SET gui TO GUI(200).
SET button TO gui:ADDBUTTON("OK").
gui:SHOW().
UNTIL button:TAKEPRESS WAIT(0.1).
gui:HIDE().
See the “ADD” functions in the BOX structure for
the other widgets you can add.
Warning: Setting BOTH width and height to 0 to let it choose automatic resizing in both dimensions will often lead to a look you won’t like. You may find that to have some control over the layout you will need to specify one of the two dimensions and only let it resize the other.
Removing all Windows
-
CLEARGUIS()
If you want to conveniently clear away all GUI windows that you
created from this CPU, you can do so with the CLEARGUIS()
built-in function. It will call GUI:HIDE and GUI:DISPOSE
for all the gui windows that were made using this particular CPU part.
(If you have multiple kOS CPUs, and some GUIs are showing that were made
by other kOS CPUs, those will not be cleared by this.)
Note
This built-in function was added mainly so you have a way to easily clean up after a program has crashed which left behind some GUI windows that are now unresponsive because the program isn’t running anymore.
Communication Delay
If communication delay is enabled (eg. using RemoteTech), you will still be able to interact with a GUI, but changes to values and messages will incur the same sort of signal delay that interactive control over the vessel would incur. (If your vessel can be controlled immediately because there’s a kerbal on board, then your GUI for the vessel can be controlled immediately, but if your attempts to control the vessel are being subject to a signal delay, then your attempts to click on the GUI elements will get the same delay). Similarly, changes to values in the GUI will be delayed coming back by the same rules. Some things such as GUI creation, adding widgets, etc. are immediate for simplicity.
If you want to test or experiment with what your GUI would be like under
a signal delay even though you don’t really have a signal delay, you
can simulate the effect by setting the GUI:EXTRADELAY suffix
of the GUI window.